Attaching a flag to your motorcycle isn’t just about decoration—it’s a statement. Whether you’re showcasing patriotism, supporting a cause, or adding a personal touch, a securely mounted flag speaks volumes. The right placement matters too. For example, when you attach a flag, the American flag should sit at the center or to the rider’s right when displayed alone. If paired with another flag, it must always take the position of honor. By following proper etiquette and using a sturdy mount, you ensure your flag stays secure and proudly displayed during every ride.
Key Takeaways
Gather essential tools and materials, including a high-quality flag mount and a durable flag, to ensure a smooth installation process.
Choose the right type of mount for your motorcycle, such as luggage rack, axle, or license plate mounts, based on your bike’s design and your preferences.
Follow a step-by-step installation process: clean the mounting area, securely attach the mount, and ensure the flag is tightly fastened to prevent it from coming loose during rides.
Regularly inspect your flag and mount for wear and tear, tightening any loose screws and replacing damaged parts to maintain safety and stability.
Adhere to local laws and flag etiquette, ensuring your flag does not obstruct your view or essential components of your motorcycle.
Perform a test ride after installation to confirm the flag remains secure and stable, making adjustments as necessary for safety.
Tools and Materials Needed

Before you start attaching a flag to your motorcycle, gather the right tools and materials. Having everything ready will save you time and ensure a smooth installation process.
Essential Tools
Wrenches or screwdrivers (depending on the mount type)
You’ll need a wrench or screwdriver that matches the mounting hardware. These tools help you tighten bolts or screws securely, preventing the flag from coming loose during your ride. Check the type of mount you’re using to determine the exact tool required.
Zip ties or clamps (optional for extra security)
For added stability, zip ties or clamps can be a lifesaver. They provide extra reinforcement, especially if you’re riding at high speeds or on bumpy roads. While not always necessary, they’re a great backup to keep your flag firmly in place.
Cleaning supplies (to prepare the mounting area)
A clean surface ensures a better grip for the mount. Use cleaning supplies like a microfiber cloth and mild detergent to remove dirt, grease, or debris from the mounting area. This step prevents slippage and helps the mount adhere properly.
Materials
Motorcycle flag mount
Choose a high-quality motorcycle flag mount designed for durability and stability. Look for mounts made from strong materials like chrome-plated steel or aluminum. Some mounts, such as the Motorcycle Flag Mount with Whip Mount, are easy to install and can be attached to areas like the fender or luggage rack without tools.
Durable, weather-resistant flag
Select a flag made from tough, weather-resistant materials like 2-ply polyester. This ensures the flag can withstand wind, rain, and sun exposure without tearing or fading. A durable flag not only looks better but also lasts longer, saving you from frequent replacements.
Mounting hardware (bolts, screws, etc.)
Most flag mounts come with the necessary hardware, including bolts, screws, or brackets. Ensure the hardware is compatible with your motorcycle model. If you’re using a custom mount, double-check that the screws and bolts fit snugly to avoid any wobbling or instability.
Pro Tip: Investing in a complete Motorcycle Flag Mounting Kit simplifies the process. These kits often include everything you need, from the mount to the hardware, ensuring a secure and hassle-free installation.
By gathering these tools and materials, you’re setting yourself up for success. With the right preparation, attaching your flag becomes a straightforward and enjoyable task.
Choosing the Right Mount to Attach a Flag
Selecting the right mount for your motorcycle flag is crucial. A good mount ensures your flag stays secure, doesn’t interfere with your ride, and complies with safety guidelines. Let’s explore the types of mounts available and the factors you should consider when making your choice.
Types of Motorcycle Flag Mounts
Motorcycle flag mounts come in various styles, each designed for specific needs. Here are three popular options:
Luggage rack mounts
Luggage rack mounts attach directly to the rear luggage rack of your motorcycle. These mounts provide a stable base for your flag and are ideal if your bike has a sturdy rack. They’re easy to install and don’t obstruct other parts of your motorcycle. This option works well for riders who want a reliable and straightforward solution.
Axle mounts
Axle mounts connect to the rear axle of your motorcycle. These mounts are compact and keep the flag positioned lower on the bike. They’re a great choice if you prefer a sleek look or don’t have a luggage rack. However, ensure the mount doesn’t interfere with the wheel or suspension for a safe ride.
License plate mounts
License plate mounts attach to the area around your license plate. These mounts are discreet and don’t require additional space on your bike. They’re perfect for riders who want a clean and minimalistic setup. When using this type, make sure the flag doesn’t block your license plate or brake lights to stay compliant with traffic laws.
Tip: If you’re unsure which mount suits your bike, check your motorcycle’s manual or consult with a professional. Compatibility is key to a secure and hassle-free installation.
Factors to Consider
When choosing a flag mount, keep these important factors in mind:
Compatibility with your motorcycle model
Not all mounts fit every motorcycle. Check if the mount is designed for your bike’s make and model. Some mounts are universal, but others cater to specific designs. Ensuring compatibility prevents installation issues and keeps your flag secure.
Durability and material of the mount
A durable mount withstands the elements and the vibrations of the road. Look for mounts made from materials like chrome-plated steel or aluminum. These materials resist rust and provide long-lasting performance. A strong mount ensures your flag stays in place, even during high-speed rides.
Ease of installation and removal
Choose a mount that’s easy to install and remove. Some mounts require tools, while others use quick-release mechanisms. If you plan to switch flags or remove the mount frequently, opt for a user-friendly design. This saves time and effort while maintaining flexibility.
Pro Tip: Consider a mount with adjustable angles. This feature lets you position your flag for maximum visibility without compromising safety.
By understanding the types of mounts and evaluating these factors, you can confidently choose the best option for your motorcycle. A well-chosen mount not only enhances your bike’s appearance but also ensures your flag remains secure and proudly displayed.
Step-by-Step Instructions to Attach a Flag

Attaching a flag to your motorcycle is a rewarding process when done correctly. Follow these steps to ensure your flag stays secure and looks great during every ride.
Step 1: Prepare Your Motorcycle
Before you begin, preparation is key. A clean and defect-free setup ensures a strong and stable attachment.
Clean the mounting area to ensure a secure fit.
Start by cleaning the area where you’ll attach the mount. Use a microfiber cloth and mild detergent to remove dirt, grease, or debris. A clean surface helps the mount grip better and prevents slippage. Skipping this step could lead to an unstable installation, especially at high speeds.
Inspect the flag and mount for any defects.
Examine the flag and mount carefully. Look for tears, frayed edges, or rusted hardware. If you notice any damage, replace the defective parts before proceeding. A damaged flag or mount can compromise safety and diminish the overall appearance of your setup.
Pro Tip: Regularly inspect your flag and mount, even after installation. This habit ensures long-term durability and safety.
Step 2: Install the Mount
The mount is the foundation of your flag setup. Installing it securely is crucial for stability.
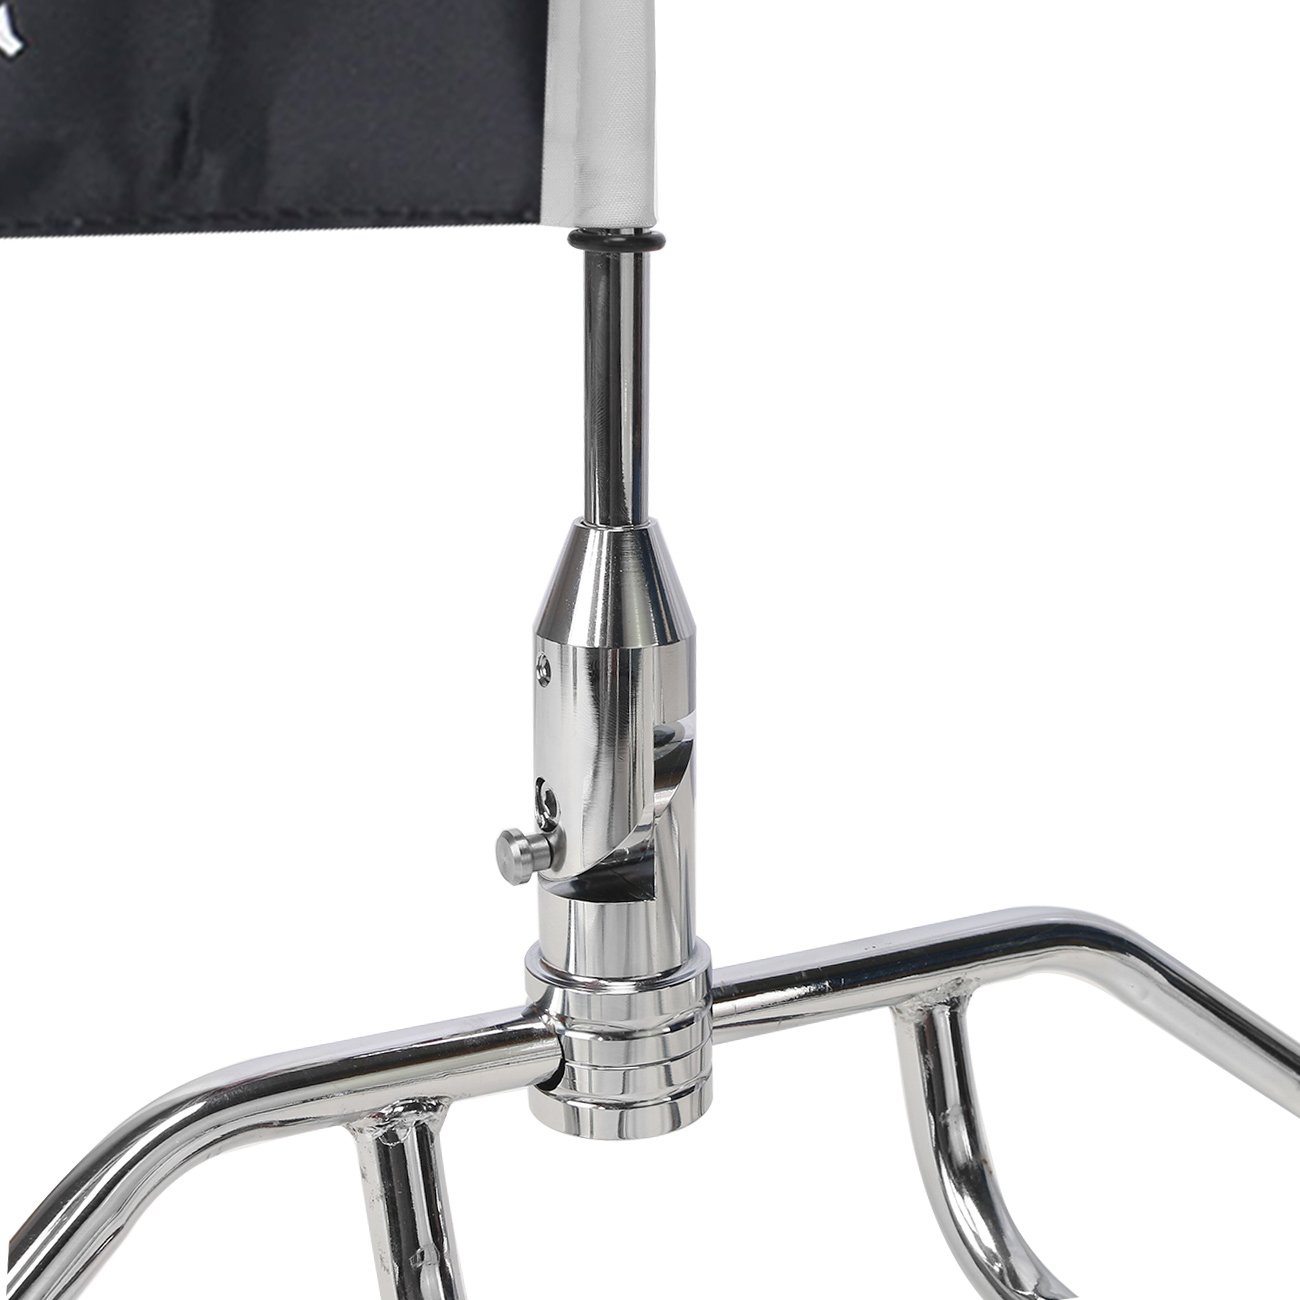
Attach the mount to the chosen location (e.g., luggage rack, axle, or license plate).
Choose the best spot on your motorcycle for the mount. Popular options include the luggage rack, axle, or license plate area. Align the mount with the chosen location and position it firmly. If you’re using a custom mount, ensure it fits snugly without interfering with other parts of your bike.
Tighten all screws or bolts securely.
Use the appropriate tools, such as a wrench or screwdriver, to tighten the screws or bolts. Make sure everything is fastened securely to prevent the mount from shifting or loosening during your ride. Double-check each connection to ensure maximum stability.
Expert Tip from American Legend Rider: “Mounting a flag on your motorcycle involves ensuring secure installation, especially at high speeds. A high-quality motorcycle flag mounting kit guarantees stability and makes the process easier.”
Step 3: Attach the Flag
With the mount in place, it’s time to attach the flag. This step brings your setup to life.
Insert the flagpole into the mount and secure it.
Slide the flagpole into the mount, ensuring it fits tightly. Some mounts come with locking mechanisms or clamps to hold the pole in place. Use these features to secure the flagpole and prevent it from wobbling or falling out.
Ensure the flag is tightly fastened and won’t come loose during the ride.
Check that the flag is firmly attached to the pole. Tug gently on the flag to test its stability. A loose flag can become a hazard, so take the time to secure it properly. If needed, use zip ties or clamps for extra reinforcement.
Did You Know? Many bikers prefer weather-resistant flags made from durable materials like 2-ply polyester. These flags withstand wind, rain, and sun exposure, ensuring they stay vibrant and intact.
By following these steps, you can confidently attach a flag to your motorcycle. A well-secured flag not only enhances your bike’s appearance but also allows you to ride with pride and peace of mind.
Step 4: Test the Setup
Testing your setup is the final step to ensure your flag stays secure and stable during your ride. This step helps you identify any potential issues before hitting the road.
Gently tug on the flag to check its stability.
Start by giving the flag a firm but gentle tug. This quick test ensures the flagpole is securely fastened to the mount and won’t wobble or come loose. Pay close attention to the mount and hardware. If you notice any movement or instability, tighten the screws or bolts again. A stable flag setup not only looks better but also prevents distractions while riding.
Expert Tip from American Legend Rider: “Mounting a flag on your motorcycle involves ensuring secure installation, especially at high speeds. A high-quality motorcycle flag mounting kit guarantees stability and makes the process easier.”
Take a short test ride to ensure the flag stays in place.
Once you’ve confirmed the flag is stable, take your motorcycle for a short test ride. Choose a safe area like an empty parking lot or a quiet street. During the ride, observe how the flag behaves. Does it stay upright? Does it flutter naturally without excessive movement? If the flag shifts or the mount feels loose, stop immediately and make adjustments. Testing your setup under real conditions ensures your flag remains secure, even at higher speeds or on bumpy roads.
Pro Tip: While testing, avoid high speeds or rough terrain until you’re confident in the setup. This precaution minimizes risks and gives you time to make necessary tweaks.
By thoroughly testing your flag setup, you can ride with confidence. A secure flag not only enhances your motorcycle’s appearance but also ensures safety for you and others on the road.
Safety and Legal Considerations for Attaching a Flag
When you attach a flag to your motorcycle, safety and legality should always come first. A secure setup not only protects you but also ensures your flag remains intact and respectful during every ride. Let’s dive into some essential tips and guidelines to keep in mind.
Safety Tips
Avoid oversized flags that could obstruct your view or balance.
Oversized flags might look impressive, but they can create serious safety risks. Large flags can block your rearview or even throw off your bike’s balance, especially at high speeds. Choose a flag size that complements your motorcycle without compromising your ability to ride safely. A smaller, well-secured flag is always better than a large one that endangers you or others on the road.
Regularly check the mount and flag for wear and tear.
Motorcycles vibrate constantly, which can loosen screws, bolts, or other hardware over time. Make it a habit to inspect your flag mount and pole before every ride. Look for signs of rust, fraying, or instability. Gently tug on the flag to ensure it’s tightly secured. If anything feels loose, tighten it immediately. Regular maintenance prevents accidents and keeps your flag flying proudly.
Quick Tip: During your inspection, double-check that the flag is upright and properly positioned. It’s a small detail, but it makes a big difference in how your flag is displayed.
Legal Guidelines
Research local laws regarding flag size and placement.
Different states and regions have specific rules about flag size and placement on vehicles. Some areas restrict oversized flags, while others require that flags don’t obstruct essential parts of your bike, like brake lights or license plates. Take a few minutes to review your local traffic laws to avoid fines or penalties.
Ensure the flag does not block your license plate or lights.
Your license plate and lights must remain visible at all times. A flag that covers these areas can lead to legal trouble and pose a safety hazard. Position your flag carefully to ensure it doesn’t interfere with these critical components. If you’re using a license plate mount, double-check that the flagpole doesn’t obscure the plate or lights.
Follow flag etiquette, such as placing the American flag in the center or to the right when displayed with other flags.
Flag etiquette matters, especially when displaying the American flag. If you’re flying multiple flags, the American flag should always take the position of honor—either in the center or to the rider’s right. This placement shows respect and aligns with traditional flag display rules. Taking the time to follow proper etiquette reflects your pride and attention to detail.
Did You Know? The American flag should never be displayed upside down unless it’s a signal of distress. Always double-check its orientation before hitting the road.
By prioritizing safety and adhering to legal guidelines, you can confidently attach a flag to your motorcycle. A secure and respectful setup not only enhances your ride but also ensures you’re setting the right example for others on the road.
Maintenance Tips for Your Flag and Mount
Keeping your flag and mount in top condition ensures they last longer and look great on every ride. Regular maintenance not only preserves their appearance but also guarantees safety and stability. Here’s how you can care for both your flag and its mount.
Caring for the Flag
Your flag faces constant exposure to the elements, so proper care is essential to maintain its durability and vibrancy.
Wash the flag regularly to remove dirt and debris.
Road dust, rain, and grime can quickly dull your flag’s colors. Washing it regularly keeps it looking fresh and prevents dirt buildup. Use a gentle detergent and cold water to clean the flag. Handwashing works best to avoid damaging the fabric. After washing, let it air dry completely before reattaching it to your motorcycle.
Quick Tip: Avoid using harsh chemicals or bleach, as they can weaken the fabric and fade the colors.
Replace the flag if it becomes frayed or damaged.
A tattered flag not only looks unappealing but also disrespects the symbol it represents. Inspect your flag often for signs of wear, such as frayed edges or faded colors. Replace it immediately if you notice any damage. A new, vibrant flag ensures your display remains respectful and eye-catching.
Did You Know? Flags made from weather-resistant materials like 2-ply polyester last longer and withstand harsh conditions better than standard fabrics.
Maintaining the Mount
The mount is the backbone of your flag setup. Keeping it secure and rust-free ensures your flag stays firmly in place during every ride.
Check the mount for rust or loose screws.
Motorcycle mounts endure constant vibrations and exposure to moisture, which can lead to rust or loosened hardware. Inspect the mount regularly for any signs of corrosion or instability. Look closely at the screws, bolts, and brackets. If you spot rust, clean it off with a rust remover and apply a protective coating to prevent further damage.
Pro Tip: A quick visual check before each ride can save you from unexpected issues on the road.
Tighten or replace hardware as needed.
Loose screws or bolts can compromise the stability of your flag mount. Use a wrench or screwdriver to tighten any hardware that feels loose. If a screw or bolt shows signs of wear, replace it immediately with a compatible part. Keeping the hardware secure ensures your flag remains steady, even on bumpy roads or at high speeds.
Expert Advice: Consider using stainless steel hardware for better resistance to rust and long-term durability.
By following these maintenance tips, you can keep your flag and mount in excellent condition. A well-maintained setup not only enhances your motorcycle’s appearance but also ensures your flag flies proudly and safely wherever you go.
Attaching a flag to your motorcycle is a simple yet meaningful way to express yourself. With the right tools and a sturdy mount, you can ensure your flag stays secure and looks great on every ride. Following these steps not only keeps your setup safe but also lets you ride with pride. Regular maintenance of both the flag and mount will keep them in top condition for years to come. Whether you’re showcasing patriotism or supporting a cause, a well-displayed flag adds a unique touch to your journey.
FAQ
How do I ensure my flag stays securely attached during a ride?
To keep your flag secure, always double-check the tightness of screws and bolts on the mount. Motorcycle vibrations can loosen hardware over time, so inspect the setup before every ride. Make sure the flagpole fits snugly into the mount and use additional reinforcements like zip ties if needed. A stable mount prevents accidents and ensures your flag remains proudly displayed.
Quick Tip: Gently tug on the flag after installation to test its stability. If it moves, tighten the hardware again.
Can I use any type of flag for my motorcycle?
Not all flags are suitable for motorcycles. Choose a durable, weather-resistant flag made from materials like 2-ply polyester. These flags withstand wind, rain, and sun exposure without tearing or fading. Avoid oversized flags, as they can obstruct your view or affect your bike’s balance.
Did You Know? Weather-resistant flags last longer and maintain their vibrant colors, even after extended use.
What’s the best location to mount a flag on my motorcycle?
The ideal location depends on your bike’s design. Popular options include the luggage rack, axle, or license plate area. Ensure the mount doesn’t block essential components like brake lights or the license plate. Always position the flag where it won’t interfere with your ride or compromise safety.
Pro Tip: Check your motorcycle’s manual or consult a professional to find the most compatible mounting spot.
How do I follow proper flag etiquette when displaying multiple flags?
When displaying multiple flags, the American flag should always take the position of honor. Place it in the center or to the rider’s right. This placement shows respect and aligns with traditional flag display rules. Never display the American flag upside down unless signaling distress.
Reminder: Following flag etiquette reflects your pride and attention to detail.
What should I do if my flag becomes frayed or damaged?
Replace a frayed or damaged flag immediately. A tattered flag not only looks unappealing but also disrespects the symbol it represents. Regularly inspect your flag for wear and tear, especially after long rides or harsh weather conditions.
Quick Tip: Keep a spare flag on hand for quick replacements when needed.
Are there any legal restrictions for attaching a flag to my motorcycle?
Yes, some states have specific rules about flag size and placement. Ensure your flag doesn’t block your license plate, brake lights, or turn signals. Research local traffic laws to avoid fines or penalties. Staying compliant keeps you safe and respectful on the road.
Did You Know? Many regions prohibit oversized flags that could pose safety risks or obstruct visibility.
How often should I check the flag mount and hardware?
Inspect the flag mount and hardware before every ride. Vibrations from the road can loosen screws or bolts, so regular checks are essential. Look for signs of rust or instability and tighten or replace hardware as needed. A secure mount ensures your flag stays in place, even on bumpy roads.
Pro Tip: Use stainless steel hardware for better resistance to rust and long-term durability.
Can I attach a flag without a dedicated motorcycle flag mount?
While a dedicated flag mount is the safest option, you can use alternatives like clamps or zip ties for temporary setups. However, these methods may not provide the same stability as a proper mount. For long-term use, invest in a high-quality motorcycle flag mount designed for your bike.
Expert Advice: A sturdy mount not only enhances safety but also makes installation easier and more reliable.
How do I maintain my flag and mount for long-term use?
Wash your flag regularly to remove dirt and debris. Use mild detergent and cold water, and let it air dry completely. For the mount, check for rust or loose screws and clean off any corrosion. Tighten hardware as needed to keep the setup secure.
Quick Tip: Apply a protective coating to the mount to prevent rust and extend its lifespan.
What should I do if my flag shifts or comes loose during a ride?
If your flag shifts or loosens, stop immediately in a safe area. Tighten the screws or bolts on the mount and check the flagpole’s attachment. Avoid continuing your ride until the setup feels stable. A secure flag ensures safety for you and others on the road.
Reminder: Testing your setup with a short ride before heading out can help identify potential issues early.
Luvabet4 is pretty cool, I’ve had some fun times on there with their bonuses. Don’t go chasing big losses, but it is good for a go on luvabet4