
Riding your Harley Street Glide should feel exhilarating, and a great audio system can make it even better. Imagine cruising down the highway with crystal-clear sound that cuts through the wind and engine noise. Upgrading your audio setup transforms your experience, letting you enjoy your favorite music with unmatched clarity and volume. In fact, 92% of Harley-Davidson owners say improving their audio system enhanced their rides. If you’re ready to take your sound to the next level, it’s time to replace the speakers and elevate your journey.
Key Takeaways
Upgrading your Harley Street Glide speakers significantly enhances sound clarity and volume, making every ride more enjoyable.
Aftermarket speakers offer customizable options, allowing you to tailor your audio experience to your personal preferences.
Proper preparation and the right tools are essential for a smooth speaker replacement process; gather everything you need before starting.
Ensure compatibility of new speakers and amplifiers with your Street Glide to avoid installation issues and maximize performance.
Regular maintenance, such as cleaning and inspecting wiring, helps prolong the life of your upgraded audio system.
Adjusting audio settings and considering additional enhancements, like lower fairing speakers or a high-efficiency amplifier, can further improve sound quality.
Avoid common mistakes, such as improper wiring and skipping safety precautions, to ensure a successful installation and optimal audio performance.
Why Replace the Speakers on Your Harley Street Glide?
Upgrading your Harley Street Glide’s speakers isn’t just about better sound; it’s about transforming your entire riding experience. Whether you’re cruising through city streets or tackling long highway stretches, a high-quality audio system can make every mile more enjoyable. Let’s dive into why replacing your factory speakers is worth it.
Benefits of Upgrading Street Glide Speakers
Swapping out your stock speakers for upgraded ones brings a host of benefits that you’ll notice immediately:
Enhanced Sound Clarity: Aftermarket speakers deliver crisp, clear audio that cuts through wind and engine noise. You’ll hear every lyric and beat, even at higher speeds.
Increased Volume: Factory speakers often struggle to maintain volume without distortion. Upgraded speakers, paired with a quality amplifier, ensure your music stays loud and distortion-free.
Customizable Options: With so many speaker options available, you can tailor your audio setup to match your preferences. Whether you want booming bass or balanced mids and highs, there’s a solution for you.
Improved Durability: Many aftermarket speakers are built with weather-resistant materials, making them more durable against rain, dust, and road vibrations.
“92% of Harley-Davidson motorcycle owners agreed that upgrading their audio system vastly improved their overall riding experience.” This statistic highlights how impactful a speaker upgrade can be for riders like you.
Common Limitations of Factory Audio Systems
While the stock audio system on your Street Glide gets the job done, it has its shortcomings. Recognizing these limitations can help you understand why an upgrade is a smart move:
Limited Power Output: Factory systems often lack the power needed to produce loud, clear sound. This becomes especially noticeable when riding at high speeds.
Basic Speaker Quality: Stock speakers are designed for general use, not premium performance. They may lack the depth and richness you’d expect from a high-quality audio system.
Minimal Customization: The factory setup doesn’t offer much flexibility. You’re stuck with the default sound profile, which might not suit your preferences.
Susceptibility to Wear and Tear: Over time, factory speakers can degrade due to exposure to the elements and constant vibration, leading to reduced performance.
By addressing these limitations with an upgraded system, you’ll unlock a whole new level of audio performance. Whether you’re a casual rider or a long-distance traveler, better speakers mean better rides.
Recommended Street Glide Speakers and Amplifiers
Upgrading your Harley Street Glide audio system starts with choosing the right speakers and amplifiers. The right combination ensures you get powerful, clear sound that enhances every ride. Let’s explore some of the best options available and what to consider when making your selection.
Top Speaker Options for Harley Street Glide
When it comes to upgrading your street glide speakers, you’ll want options that deliver exceptional sound quality and durability. Here are some top picks:
Cicada Audio Speakers: These speakers are specifically designed for Harley-Davidson motorcycles. They provide a seamless fit and deliver high-quality sound, even at highway speeds. Their weather-resistant build ensures they can handle tough riding conditions.
Harley-Davidson Audio Powered by Rockford Fosgate®: This premium line of motorcycle speakers offers cutting-edge performance. With crystal-clear sound and robust construction, these speakers set a new standard for motorcycle audio.
Polk MM651 and Infinity Kappa 62.11i: These popular aftermarket options are known for their affordability and excellent sound clarity. They’re a great choice if you’re looking for a balance between performance and cost.
Each of these options ensures your new speaker install will deliver the volume and clarity you need for an unforgettable riding experience.
Best Amplifiers for Enhanced Audio Performance
Pairing your upgraded speakers with a high-quality amplifier is essential for maximizing your audio system’s potential. Here are some of the best amplifiers for Harley Street Glide:
Top Amplifiers for Harley Street Glide: These amplifiers are specifically designed to fit Harley-Davidson models like the Street Glide. They provide excellent power output and compatibility, ensuring your audio system performs at its best.
Rockford Fosgate Amplifiers: Known for their reliability and performance, these amplifiers deliver clean, distortion-free sound. They’re a perfect match for Harley-Davidson’s premium audio systems.
Compact Motorcycle Amplifiers: If space is a concern, compact amplifiers offer a great solution. Despite their smaller size, they pack a punch and provide the power needed to drive your upgraded speakers.
Adding an amplifier to your setup ensures your music stays loud and clear, even at high speeds.
Key Factors to Consider When Choosing Equipment
Selecting the right speakers and amplifiers for your Harley Street Glide requires careful consideration. Keep these factors in mind to make the best choice:
Compatibility: Ensure the speakers and amplifiers you choose are compatible with your Street Glide’s audio system. This avoids installation issues and ensures optimal performance.
Power Output: Look for amplifiers with enough power to drive your speakers without distortion. Higher power output means better sound clarity and volume.
Durability: Choose equipment built to withstand the elements. Weather-resistant materials ensure your audio system lasts through rain, dust, and vibrations.
Ease of Installation: Opt for products designed for easy installation. Many aftermarket options are made to fit seamlessly into your motorcycle, simplifying the new speaker install process.
Sound Preferences: Consider your personal preferences. Whether you want deep bass or balanced mids and highs, select equipment that matches your desired sound profile.
By focusing on these factors, you’ll create an audio system that transforms your rides into an immersive experience.
Tools and Preparation for Replacing the Speakers
Getting ready to replace your Harley Street Glide speakers requires the right tools and a bit of preparation. With everything in place, the process becomes smoother and more enjoyable. Let’s break it down step by step.
Essential Tools for the Job
Before you start, gather all the tools you’ll need. Having the right equipment ensures you can complete the job efficiently without unnecessary delays. Here’s a list of must-have tools:
Screwdrivers: A set of Phillips and flathead screwdrivers will help you remove screws from the fairing and other components.
Allen Wrenches: These are essential for loosening and tightening bolts on your motorcycle.
Socket Wrench Set: Use this to remove bolts securely and avoid damaging the hardware.
Panel Removal Tool: This tool helps you safely detach panels without scratching or cracking them.
Wire Strippers and Crimpers: These are necessary for handling speaker wires during installation.
Multimeter: Use this to test electrical connections and ensure proper wiring.
Zip Ties: These keep wires organized and prevent them from tangling or interfering with other parts.
Protective Gloves: Wear gloves to protect your hands from sharp edges and debris.
Having these tools ready will save you time and frustration during the replacement process.
Preparing Your Street Glide for Speaker Replacement
Preparation is key to a successful speaker upgrade. Taking the time to get your bike ready ensures a smooth installation and protects your motorcycle from accidental damage. Follow these steps to prepare your Street Glide:
Park in a Safe, Well-Lit Area
Choose a flat, stable surface to work on your bike. A well-lit garage or driveway is ideal. Make sure the area is free of clutter to avoid tripping hazards.Disconnect the Battery
Safety comes first. Disconnect the negative terminal of your battery to prevent electrical shocks or short circuits while working on the audio system.Clean the Fairing and Surrounding Areas
Wipe down the fairing and nearby surfaces to remove dirt and debris. This prevents dust from getting into the speaker components during installation.Inspect the Existing Audio System
Take a close look at your current setup. Identify the location of the factory speakers and note how they’re mounted. This will help you understand what needs to be removed and replaced.Organize Your Tools and Equipment
Lay out all your tools and new audio components within easy reach. Double-check that you have everything you need before starting.Review the Installation Instructions
If your new speakers or amplifier come with instructions, read them carefully. Familiarize yourself with the steps to avoid surprises during the process.
By preparing your bike and workspace, you’ll set yourself up for a hassle-free speaker replacement. Taking these steps ensures you can focus on the fun part—upgrading your audio system!
Step-by-Step Guide to Replacing Your Street Glide Speakers
Upgrading your Harley Street Glide audio system is an exciting project. With the right steps, you can replace the speakers and enjoy a sound system that transforms your rides. Follow this guide to make the process smooth and hassle-free.
Removing the Fairing
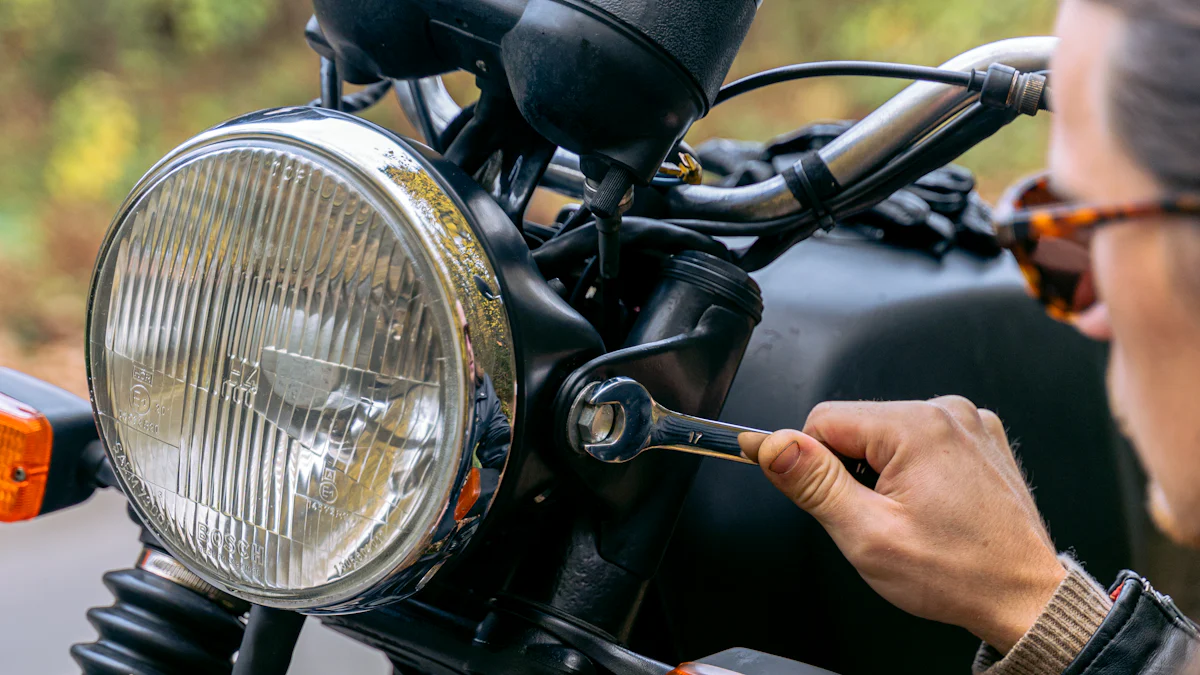
The first step to replace the speakers on your Street Glide is removing the fairing. This gives you access to the factory speakers and wiring. Here’s how you can do it:
Locate the Screws
Identify the screws securing the fairing. These are usually found near the windshield and around the edges of the fairing.Remove the Windshield
Unscrew and carefully lift off the windshield. Place it in a safe spot to avoid scratches or damage.Detach the Fairing Screws
Use a screwdriver or Allen wrench to remove the screws holding the fairing in place. Keep the screws organized so you can easily reassemble them later.Disconnect the Headlight Wiring
Gently pull the fairing forward and locate the headlight wiring. Unplug the connector to fully detach the fairing.Set the Fairing Aside
Place the fairing on a soft surface to prevent scratches. Now, you have clear access to the factory speakers.
Pro Tip: Take pictures of the wiring and screw placements before removing anything. This makes reassembly much easier.
Unplugging and Removing the Factory Speakers
Once the fairing is off, it’s time to remove the stock speakers. Here’s what you need to do:
Locate the Speaker Mounts
Find the factory speakers mounted inside the fairing. They’re usually secured with screws or bolts.Unplug the Speaker Wires
Carefully disconnect the wires attached to the speakers. Pull gently to avoid damaging the connectors.Remove the Mounting Screws
Use a screwdriver or socket wrench to unscrew the speaker mounts. Keep these screws handy in case you need them for the new speakers.Take Out the Factory Speakers
Lift the speakers out of their mounts. Inspect the area for any dust or debris and clean it if necessary.
Did You Know? Factory speakers often lack the power and clarity needed for high-quality sound. Replacing them with aftermarket options ensures a noticeable improvement in audio performance.
Installing the New Speakers
Now comes the fun part—installing your upgraded speakers. Follow these steps to complete the replacement:
Check Compatibility
Before installation, ensure your new speakers fit the mounts and are compatible with your Street Glide’s audio system.Connect the Speaker Wires
Attach the wires to the new speakers. Match the positive and negative terminals to avoid wiring issues.Secure the Speakers in Place
Align the speakers with the mounting holes and use screws or bolts to secure them. Tighten them firmly but avoid over-tightening.Test the Speakers
Reconnect the battery and test the speakers before reassembling the fairing. Play some music to check for sound clarity and volume.Reattach the Fairing
Once you’re satisfied with the sound, reassemble the fairing by reversing the removal steps. Don’t forget to reconnect the headlight wiring.
Expert Insight: According to audio experts, adding more speakers or pairing them with a high-efficiency amplifier can further enhance your system. Consider this if you want even better sound quality.
Replacing your Street Glide speakers doesn’t have to be complicated. With patience and attention to detail, you’ll enjoy a powerful new audio system that makes every ride unforgettable.
Reassembling the Fairing
Reassembling the fairing is the final step in your speaker upgrade journey. This process ensures everything is securely in place and your Harley Street Glide is ready to hit the road with its enhanced audio system. Follow these steps to put the fairing back together with confidence.
Reconnect the Headlight Wiring
Start by plugging the headlight wiring back into its connector. Ensure the connection is snug and secure. A loose connection can cause issues later, so double-check before moving on.Align the Fairing Properly
Carefully position the fairing back onto your bike. Align it with the mounting points to ensure a proper fit. Take your time here—misalignment can make the reassembly process more difficult.Secure the Fairing Screws
Insert the screws you removed earlier into their respective holes. Tighten them evenly to avoid putting unnecessary stress on one side of the fairing. Use your screwdriver or Allen wrench to ensure they’re firmly in place.Reattach the Windshield
Place the windshield back onto the fairing. Line it up with the screw holes and secure it using the appropriate screws. Tighten them gently to avoid cracking the windshield.Inspect Your Work
Once everything is reassembled, take a moment to inspect your work. Check that all screws are tightened, the fairing sits flush, and the windshield is secure. Look for any gaps or misalignments that might need adjustment.Test the Audio System
Reconnect the battery and turn on your audio system. Play some music to ensure the new speakers are working perfectly. Listen for clear sound and proper volume. If everything sounds great, you’re good to go!
Pro Tip: Extreme Audio experts recommend adding more speakers or upgrading to a high-efficiency amplifier if you want to take your sound system to the next level. This can significantly enhance the clarity and volume of your music.
Reassembling the fairing might seem like a small step, but it’s crucial for protecting your new speakers and ensuring your bike looks as good as it sounds. With everything back in place, you’re ready to enjoy your upgraded audio system on every ride.
Tips for Optimizing Your Street Glide Audio System
Upgrading your Harley Street Glide speakers is just the beginning. To truly enjoy your new audio system, you need to fine-tune it and keep it in top shape. Here are some practical tips to help you get the best sound quality and ensure your system lasts for years.
Adjusting Audio Settings for Better Sound
Getting the most out of your upgraded speakers starts with adjusting the audio settings. Proper tuning can make a huge difference in how your music sounds while you ride. Follow these steps to optimize your settings:
Balance the Equalizer
Adjust the bass, midrange, and treble levels to suit your preferences. If you enjoy deep, rich tones, increase the bass slightly. For clear vocals and instruments, focus on the midrange and treble. Experiment until you find the perfect balance.Set the Volume Levels
Avoid cranking the volume to the max, as it can distort the sound and damage your speakers over time. Instead, find a comfortable level that’s loud enough to hear your music clearly without sacrificing quality.Enable Any Built-In Enhancements
Some amplifiers or audio systems come with built-in features like bass boost or surround sound. Activate these settings if they enhance your listening experience, but don’t overdo it. Too much bass or reverb can muddy the sound.Test with Different Music Genres
Play a variety of music to ensure your settings work well across different styles. Whether you’re into rock, country, or pop, your system should deliver consistent clarity and depth.
Pro Tip: Adjust your settings while parked in a quiet area. This helps you hear the changes more clearly and fine-tune your system without distractions.
Enhancements to Improve Sound Quality
Even after upgrading your speakers, there are additional ways to enhance your audio system. These small tweaks can make a big impact on how your music sounds during your rides.
Add Lower Fairing Speakers
Installing lower fairing speakers can improve sound projection and volume. These speakers are closer to your ears, making it easier to hear your music over road noise.Upgrade to a High-Efficiency Amplifier
A powerful amplifier ensures your speakers perform at their best. It boosts the sound output, delivering louder and clearer music without distortion.Install Noise-Reducing Accessories
Wind and engine noise can interfere with your music. Consider adding wind deflectors or sound-dampening materials to minimize these distractions and enjoy a cleaner audio experience.Use High-Quality Audio Files
Low-quality music files can limit your system’s performance. Switch to high-resolution audio formats for richer, more detailed sound.Consider Adding a Subwoofer
If you love bass-heavy music, a compact subwoofer can add depth and power to your sound system. Look for motorcycle-specific models that fit seamlessly into your setup.
Did You Know? Many riders notice a significant improvement in sound quality when they pair their upgraded speakers with a dedicated amplifier. It’s a game-changer for music lovers.
Maintenance Tips for Long-Lasting Performance
Keeping your audio system in great condition ensures you’ll enjoy your music for years to come. Regular maintenance prevents issues and keeps everything running smoothly. Here’s how to care for your setup:
Clean the Speakers Regularly
Dust and debris can accumulate on your speakers, affecting sound quality. Use a soft, dry cloth to wipe them down periodically. Avoid using water or harsh chemicals that could damage the components.Inspect the Wiring
Check the speaker wires and connections for any signs of wear or damage. Loose or frayed wires can cause audio issues or even short circuits. Secure any loose connections with zip ties or electrical tape.Protect Against Weather
Even weather-resistant speakers need extra care. If you ride in rain or extreme conditions, cover your speakers when not in use. This prevents moisture from seeping into the components.Avoid Overloading the System
Playing music at maximum volume for extended periods can strain your speakers and amplifier. Give your system breaks during long rides to prevent overheating and prolong its lifespan.Schedule Routine Checkups
If you’re not comfortable inspecting your audio system yourself, take your bike to a professional. Regular checkups ensure everything stays in top shape and any potential issues get addressed early.
Expert Insight: According to audio technicians, maintaining your system regularly can extend its life by several years. A little effort goes a long way in preserving sound quality.
By following these tips, you’ll enjoy crystal-clear music every time you hit the road. Your upgraded audio system will not only sound amazing but also stay reliable for countless rides ahead.
Common Mistakes to Avoid When Replacing Street Glide Speakers
Upgrading your Harley Street Glide audio system can be a game-changer, but mistakes during the process can lead to frustration or poor results. Avoiding these common pitfalls ensures your new setup works flawlessly and delivers the sound quality you’re after.
Skipping Compatibility Checks
One of the biggest mistakes riders make is skipping compatibility checks when choosing new speakers. Not all aftermarket options fit seamlessly into your Street Glide’s existing setup. If you install incompatible speakers, you might face issues like poor sound quality, improper mounting, or even electrical problems.
Before purchasing, confirm that your new speakers match the size and specifications of your stock ones. For example, the stock speakers on most Harley Street Glide models are 6.5 inches. Ensure your replacements fit this size unless you plan to modify the mounts. Additionally, check the power requirements of the speakers and amplifiers. A mismatch in power output can lead to distortion or underperformance.
Pro Tip: Look for speakers specifically designed for Harley-Davidson motorcycles. These options often provide a better fit and easier installation.
Improper Wiring and Connections
Wiring mistakes are another common issue during speaker upgrades. Incorrect connections can result in poor sound quality, intermittent audio, or even damage to your system. Many riders rush through this step, leading to loose wires or reversed polarity.
Take your time when handling the wiring. Match the positive and negative terminals correctly to avoid phase issues, which can cause your speakers to sound weak or distorted. Use wire strippers and crimpers to ensure clean, secure connections. A multimeter can help you test the wiring before reassembling the fairing. Organized wiring also prevents tangling or interference with other components.
Did You Know? A properly wired system improves the signal-to-noise ratio, reducing distortion and delivering clearer sound. This small detail makes a big difference in your listening experience.
Overlooking Safety Precautions
Safety often takes a backseat during DIY projects, but it’s crucial when working on your motorcycle. Overlooking basic precautions can lead to injuries or damage to your bike. For instance, failing to disconnect the battery before starting can result in electrical shocks or short circuits.
Always start by disconnecting the negative terminal of your battery. Wear protective gloves to shield your hands from sharp edges or debris. When removing the fairing, handle it carefully to avoid scratches or cracks. Keep your tools organized to prevent accidents, and work in a well-lit, stable area to minimize risks.
Pro Tip: Take photos of your stock setup before disassembling anything. These reference images can save you time and confusion during reassembly.
By avoiding these common mistakes, you’ll ensure a smoother installation process and a better-performing audio system. Taking the time to check compatibility, handle wiring carefully, and prioritize safety pays off in the long run. Your upgraded speakers will deliver the powerful, crystal-clear sound you’ve been dreaming of.
Upgrading your Harley Street Glide speakers is more than just a technical task—it’s a way to elevate every ride. By following this guide, you’ve learned how to replace your factory speakers, choose the right equipment, and optimize your audio system for peak performance. Take your time during the process, and don’t rush the installation. With the right tools and preparation, you’ll enjoy crisp, clear sound that cuts through road noise and enhances your journey. Now, hit the road with confidence and let your upgraded audio system transform your Harley experience.
FAQ
How do I know if my new speakers are compatible with my Street Glide?
You need to check the size and specifications of your new speakers. Most Harley Street Glide models use 6.5-inch speakers, so ensure your replacements match this size unless you plan to modify the mounts. Also, verify the power requirements of the speakers and confirm they align with your audio system. Compatibility ensures proper installation and optimal performance.
Do I need an amplifier for my upgraded audio system?
Yes, adding an amplifier can significantly enhance your audio experience. Many riders report that amplifiers improve sound clarity, delivering punchier lows and more transparent highs. With an amplifier, your music remains clear and powerful, even at high speeds. It’s a worthwhile addition if you want to maximize your system’s potential.
“Riders often share how the amplifier has transformed their rides, letting them enjoy their favorite music with unmatched clarity while cruising down the road.”
Can I install lower fairing speakers on my Street Glide?
Yes, you can install lower fairing speakers to improve sound quality and volume. These speakers are positioned closer to your ears, making it easier to hear your music over road noise. They’re a great addition if you want a more immersive audio experience during your rides.
What tools do I need to replace my Street Glide speakers?
You’ll need a few essential tools for the job, including screwdrivers, Allen wrenches, a socket wrench set, wire strippers, and a multimeter. A panel removal tool can help you safely detach panels without causing damage. Having these tools ready ensures a smooth and efficient installation process.
How can I protect my upgraded audio system from weather damage?
Choose weather-resistant speakers and amplifiers designed for motorcycles. Even with durable components, cover your speakers when not in use, especially during rain or extreme conditions. Regularly inspect your system for signs of wear and clean it to prevent dust and debris from affecting performance.
Will upgrading my speakers void my motorcycle’s warranty?
In most cases, upgrading your speakers won’t void your warranty, but it’s always best to check with your dealer or manufacturer. Ensure you follow proper installation procedures and avoid damaging other components during the process. If you’re unsure, consult a professional for assistance.
How can I optimize the sound quality of my upgraded audio system?
Start by adjusting the equalizer settings to balance bass, midrange, and treble levels. Avoid maxing out the volume to prevent distortion. Use high-quality audio files for better sound reproduction. Adding a high-efficiency amplifier or lower fairing speakers can also enhance your system’s performance.
Pro Tip: Riders often notice a dramatic improvement in sound clarity and volume when pairing upgraded speakers with a dedicated amplifier.
Can I install the new speakers myself, or should I hire a professional?
You can install the speakers yourself if you’re comfortable with basic tools and following instructions. This guide provides step-by-step instructions to help you through the process. However, if you’re unsure or lack the necessary tools, hiring a professional ensures a seamless installation.
How long does it take to replace the speakers on a Street Glide?
The process typically takes a few hours, depending on your experience and preparation. Removing the fairing, unplugging the factory speakers, and installing the new ones require patience and attention to detail. Preparing your tools and workspace beforehand can save time and make the process smoother.
What are the benefits of upgrading my Street Glide’s audio system?
Upgrading your audio system transforms your riding experience. You’ll enjoy clearer sound, higher volume, and better durability compared to factory speakers. Many riders say their upgraded systems allow them to fully enjoy their favorite music, even at highway speeds. It’s a simple way to make every ride more enjoyable.
“Riders often mention how their upgraded audio systems deliver crystal-clear sound, cutting through wind and engine noise effortlessly.”